How to Create the Bourne Flashback Effect for Final Cut Pro X
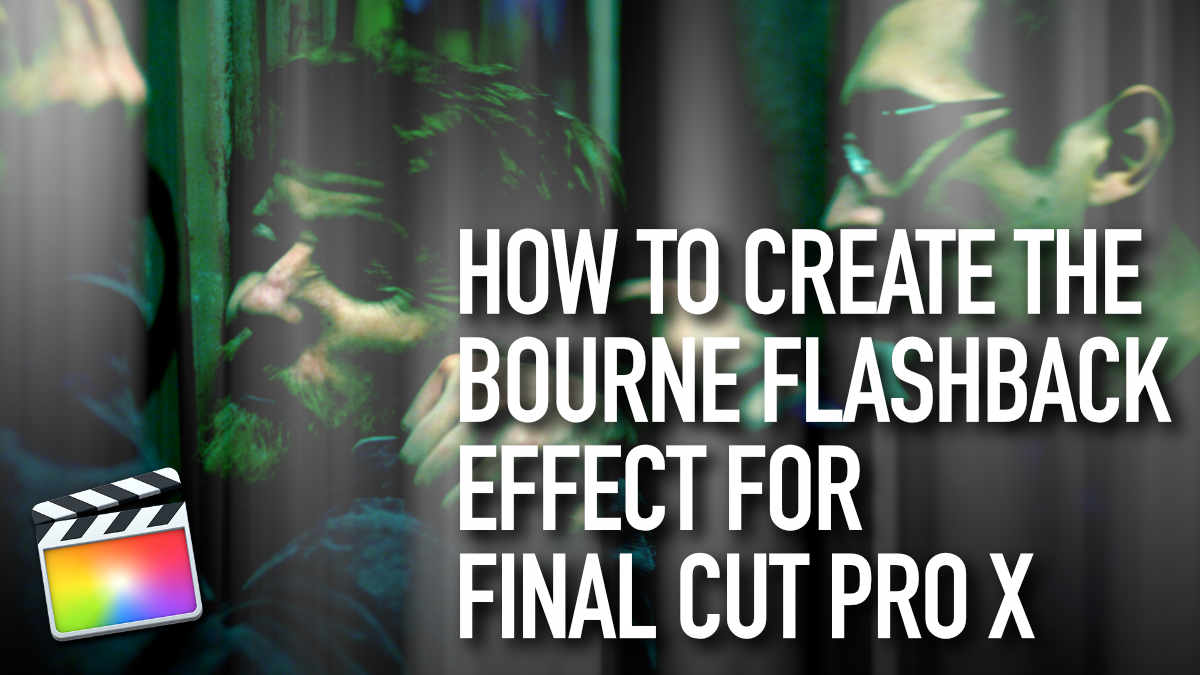
Everybody will be familiar with the flashback effect from the Jason Bourne series of films. We show you how to build the strobing, highlighted streak look for Final Cut Pro X.
We are sure you're familiar with the flashback look from the Jason Bourne series of films. Each excerpt features a heavily graded look that we are going to replicate as an effect for Final Cut Pro X.
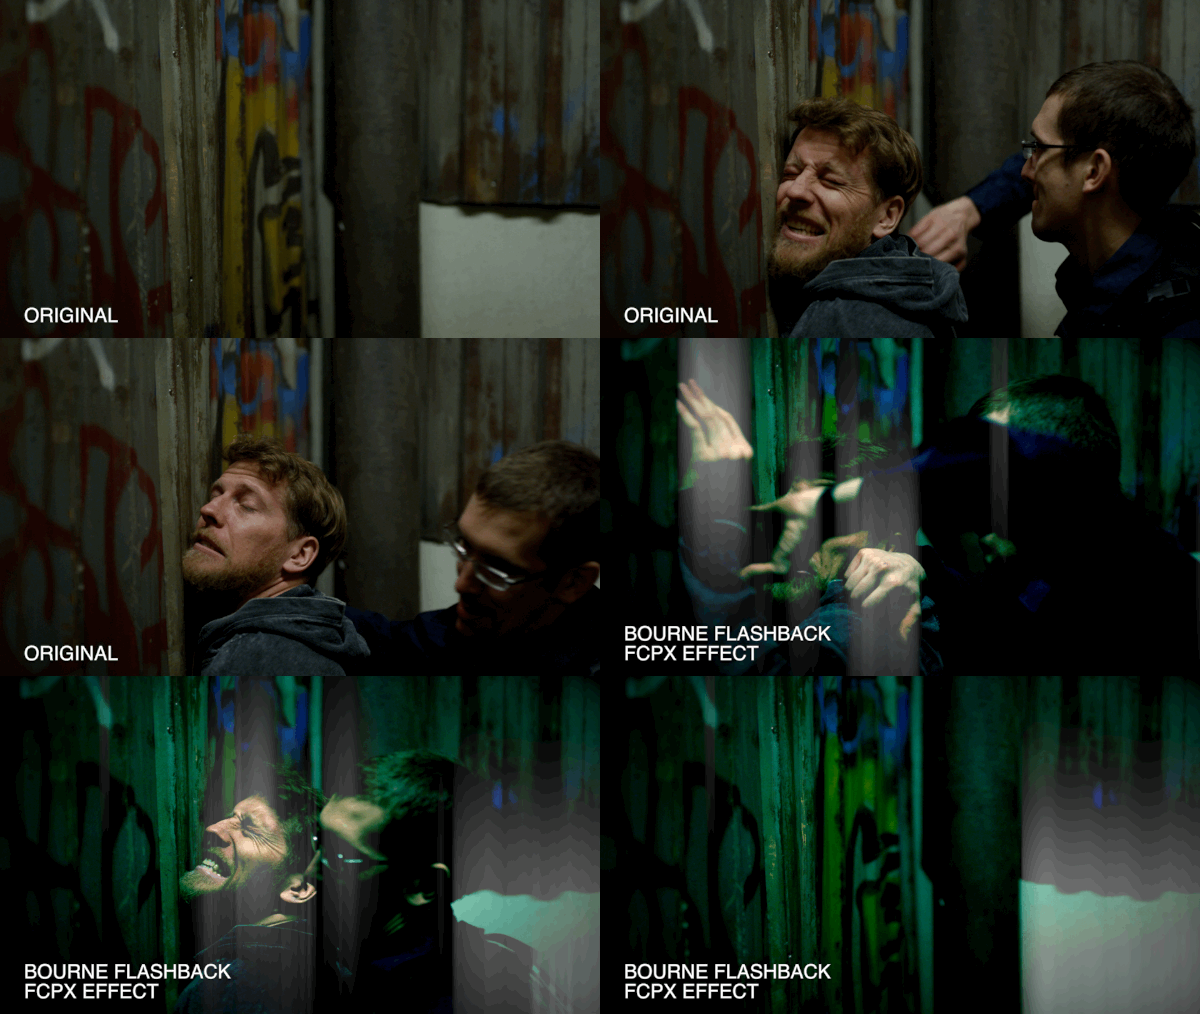
You could build the look directly in FCPX, but for this rather complicated grade, we are going to use Motion to build an effect plugin.
If you haven't bought it already, we highly recommend you own Motion, Apple's $49 motion graphics app. It unlocks unlimited creative opportunities to build your own graphics, effects, titles and transitions for FCPX.
If you don't want to buy Motion, or don't want to build the app from scratch, you can find the Bourne Flashback Effect on our store for immediate download.
However, if you would like have a go yourself, (and for free!) let's fire up Motion and get going.
We will make a new Effect. Select the Final Cut Effect icon. Then make sure Broadcast HD 1080 and 29.97 are chosen from the dropdown menus on the left hand side. No need to worry if you are going to use this in a 4K or different frame rate FCPX timeline - The effect will adapt without any quality loss.
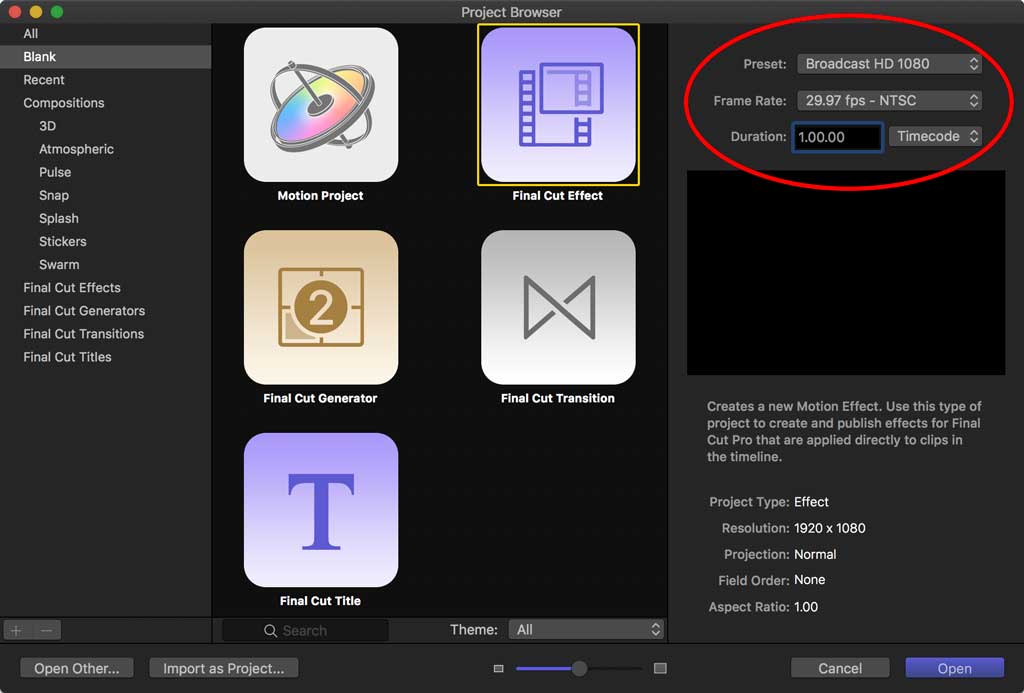
It is important though to set the duration of the effect, for this effect we will make it 1.00.00 - a minute. Normally when you build effects for Final Cut Pro X they would be much shorter, but we will be adding a temporal effect later which will make a difference.
Click Open and the Motion GUI will open
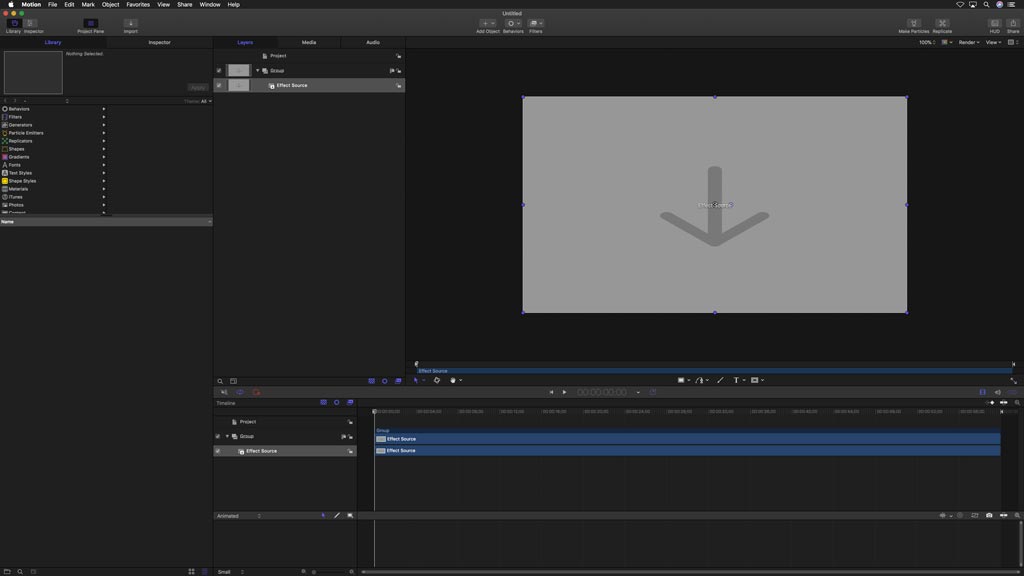
The Effect Source clip you can see in the timeline is a placeholder for the clip that the effect will be applied to when using the Motion project as a plugin back in Final Cut Pro X.
Navigate to the end of the project and hit M to set a marker on the timeline, not the clip. If the marker keeps applying itself to the clip, you need to deselect the clip in the layer list or click away in the timeline.
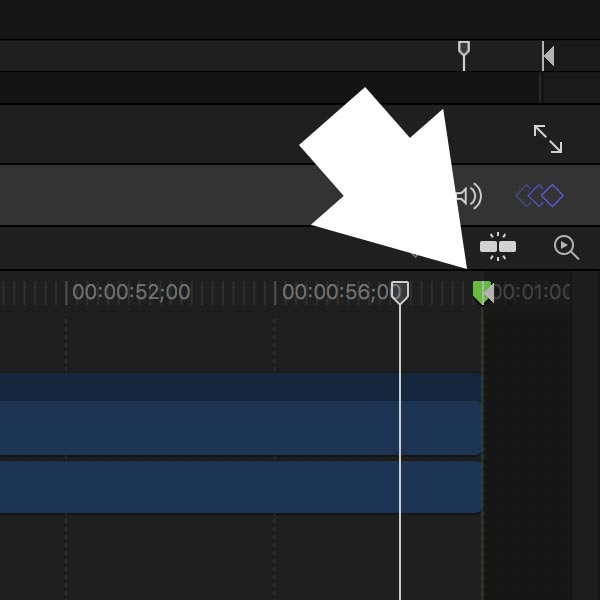
Right click on the marker in the timeline and then choose Edit Marker from the dropdown menu.
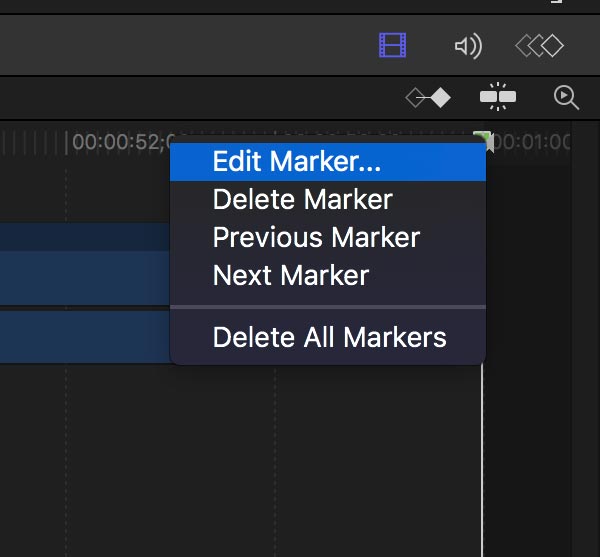
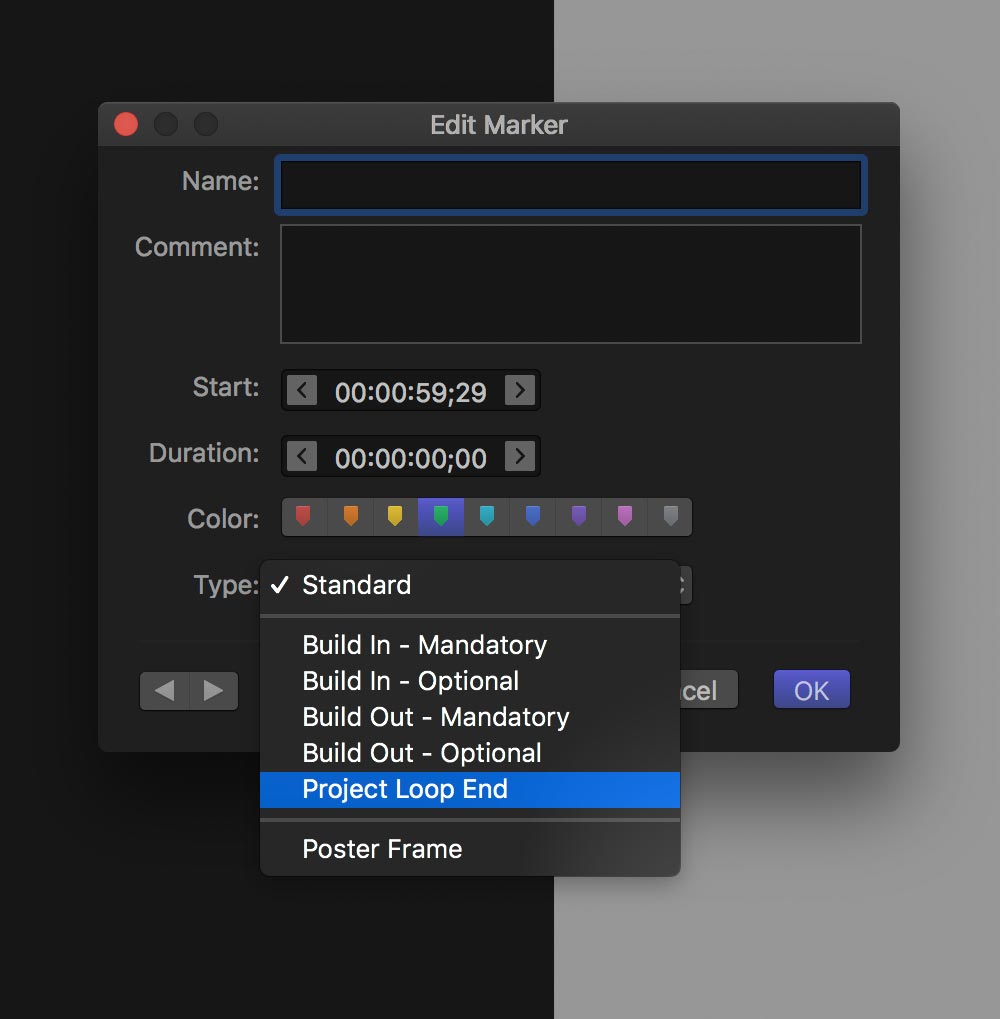
This will bring up the Edit Marker panel, select Project Loop End from the type of marker available. Then hit OK.
Now is a good time to save the effect. Press CMD S to save. Choose the name of the effect, we have entered Bourne Flashback and the category. You can make a new category for your effects, here we have entered IR TUTORIALS. Then click the Publish button, don't worry about the other settings.
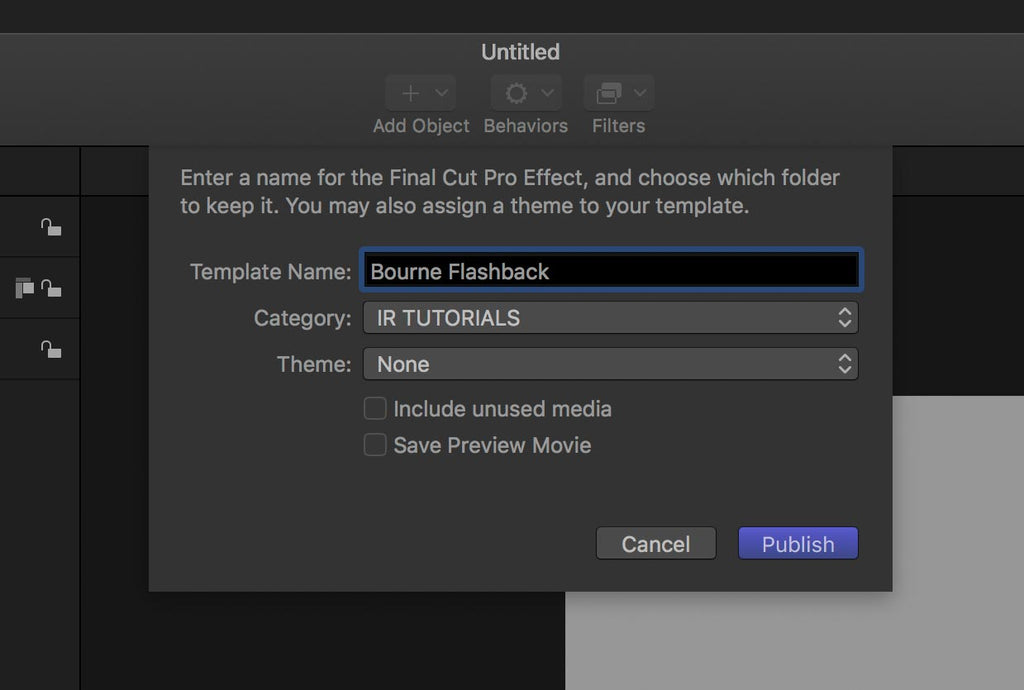
This effect plugin will now be in the Effects Browser the next time you open Final Cut Pro X. It won't do much as we haven't added any image processing or grading yet, so here is where the fun starts!
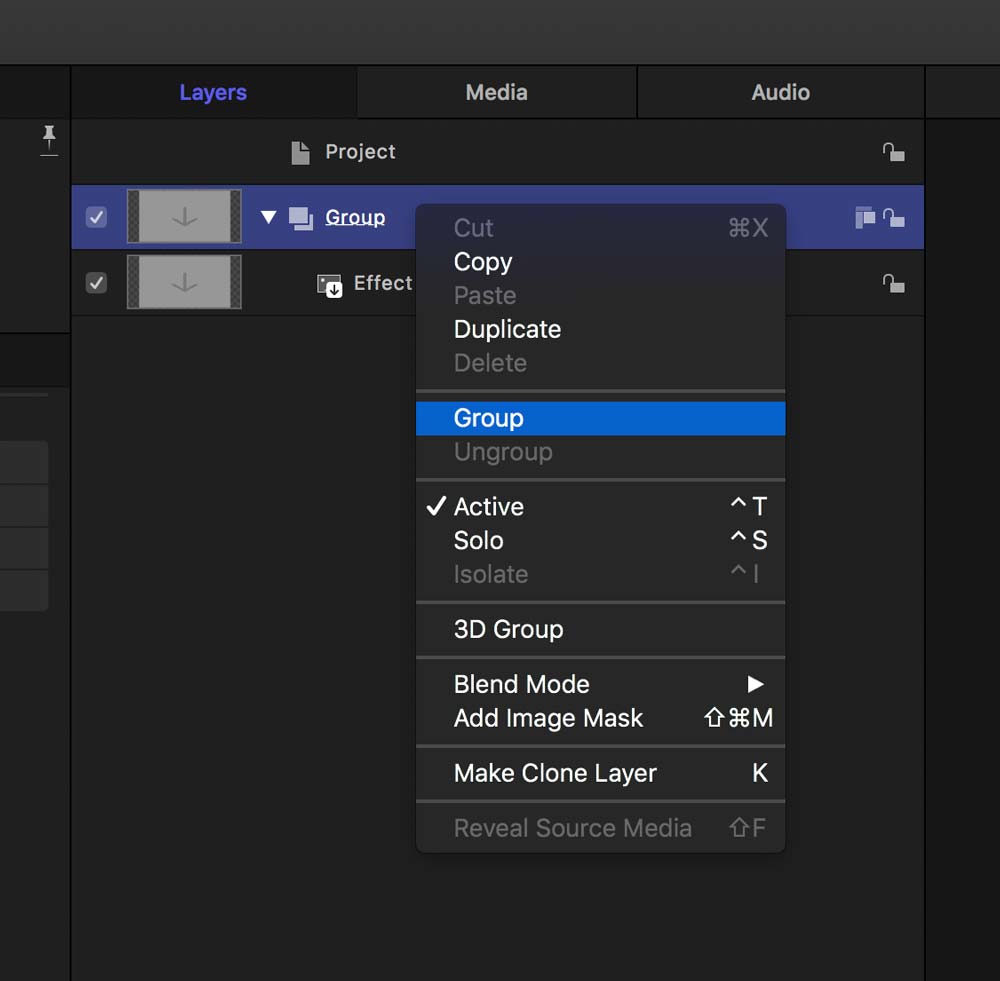
Right click on the Group in the Layers panel and select Group. This will put the Group into another Group. This leaves the original Group and Effect Clip untouched which can be useful when we come to making Clone Layers.
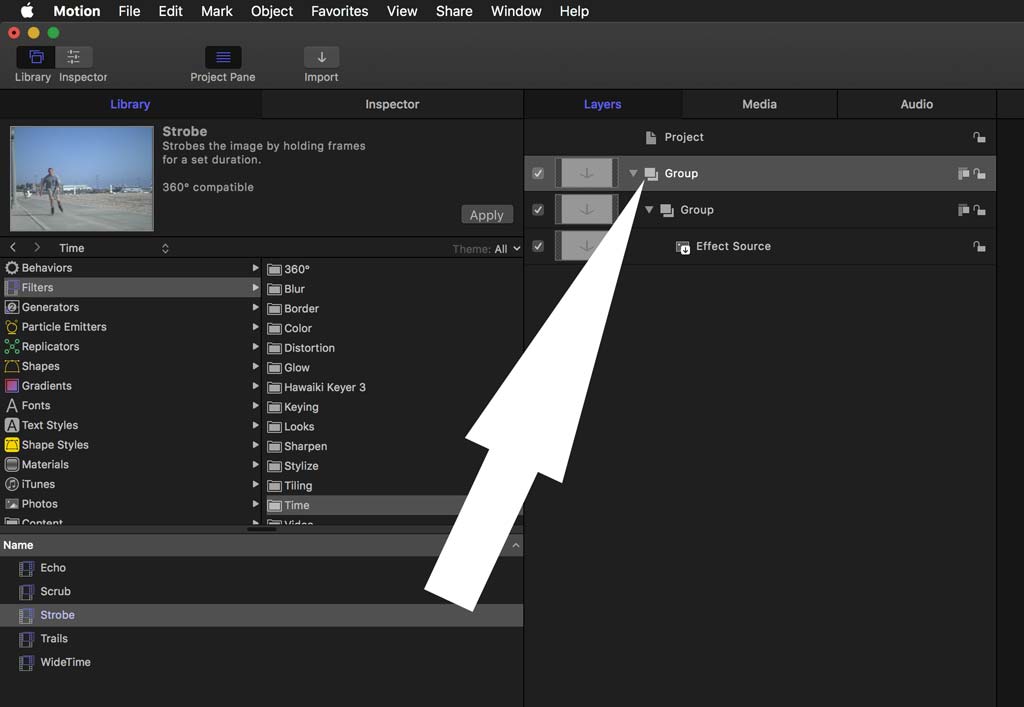
Apply the Strobe effect which can be found in the Time category from the Filters section in the Library. You can drag it straight on to the new Group that was just created.
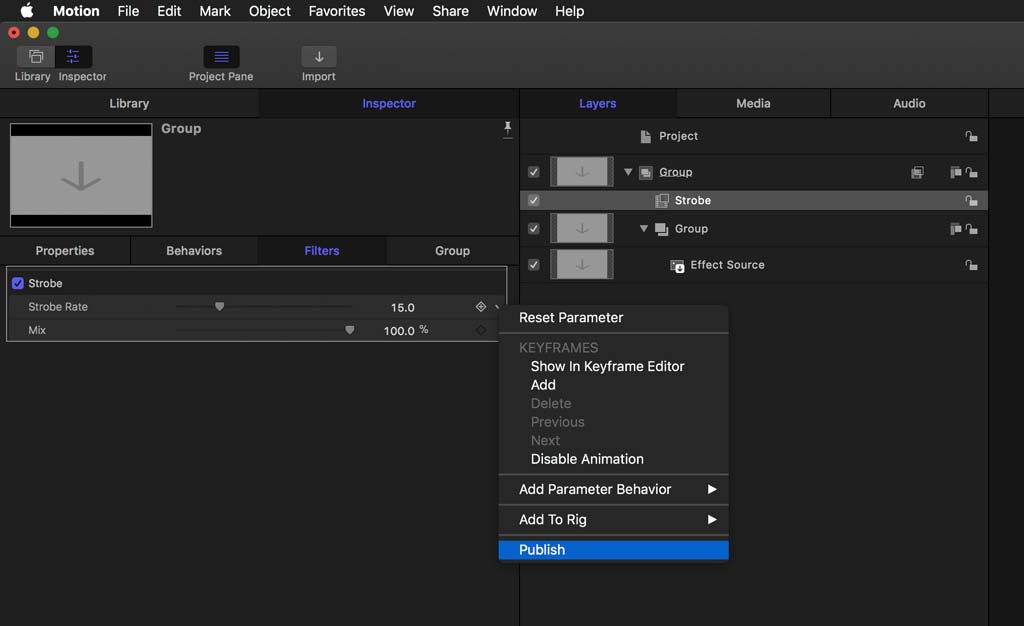
Click on the Strobe filter on new Group. You will see the adjustment parameters open up in the Inspector on the left hand side.
Right Click on Strobe Rate in the Inspector and select Publish from the drop down menu.
Check the parameter has been published by selecting Project in the Layer list and then Project again from the four headings of the Inspector.
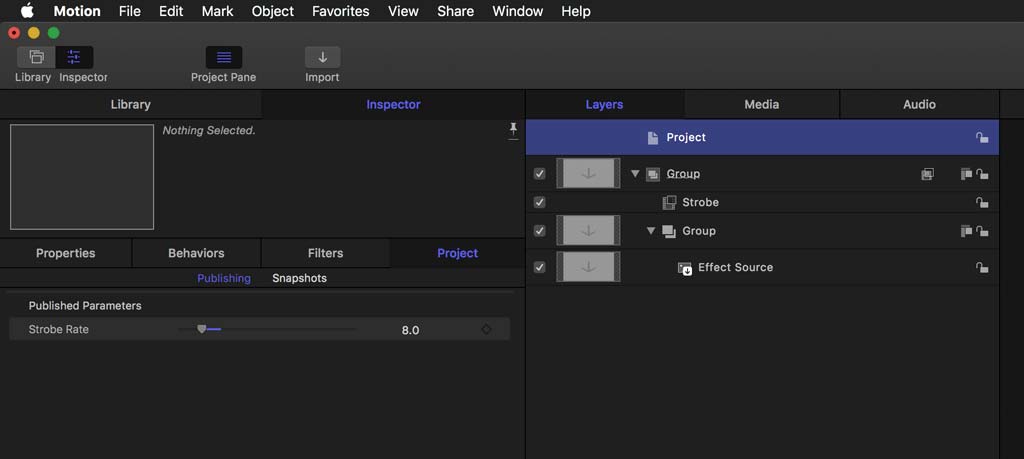
This is the parameter that will show up in the Inspector of Final Cut Pro X when the plugin has been finished. You can also rename the parameter anything you wish, but for this one we will stick with Strobe Rate.
By adding the Project Loop End marker to the Motion timeline earlier, it will make sure the Strobe effect happens at the same cadence no matter how long the clip is on the FCPX timeline.
Before we go on, we will set the default rate to 8. Another save might be a good idea too - it will just overwrite the existing plugin.
As we are going to do colour correction within the plugin in Motion, it is possible to drag media directly into a layer. This way you can see the results of any effects applied without having to save and reapply the plugin in FCPX every time.
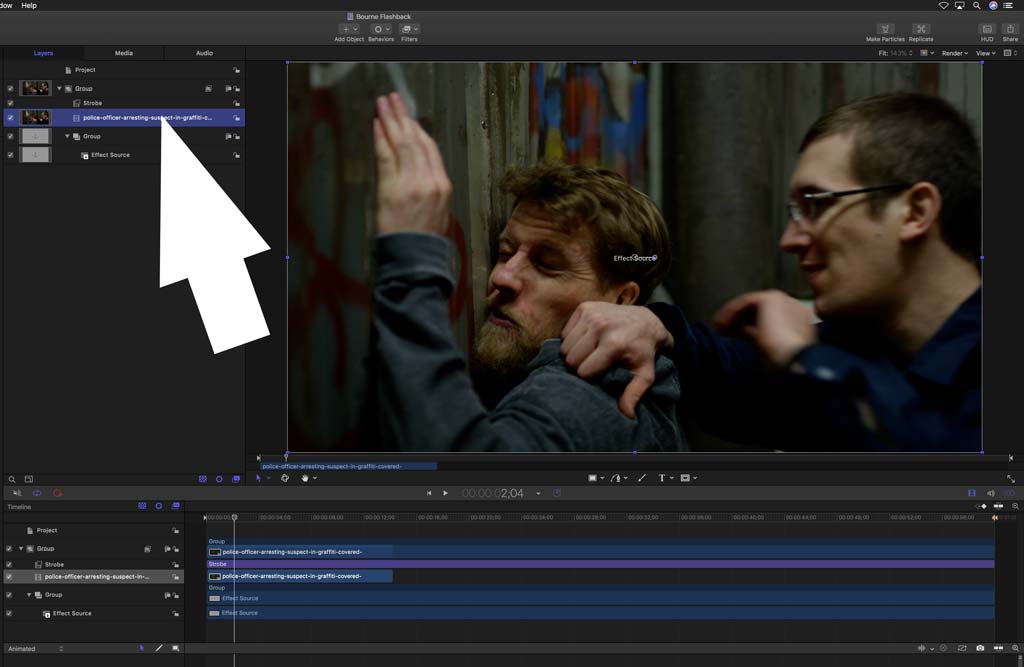
On to adding some colour correction plugins, we will start with the Levels effect from the Color selection in the Filters section in the Library.
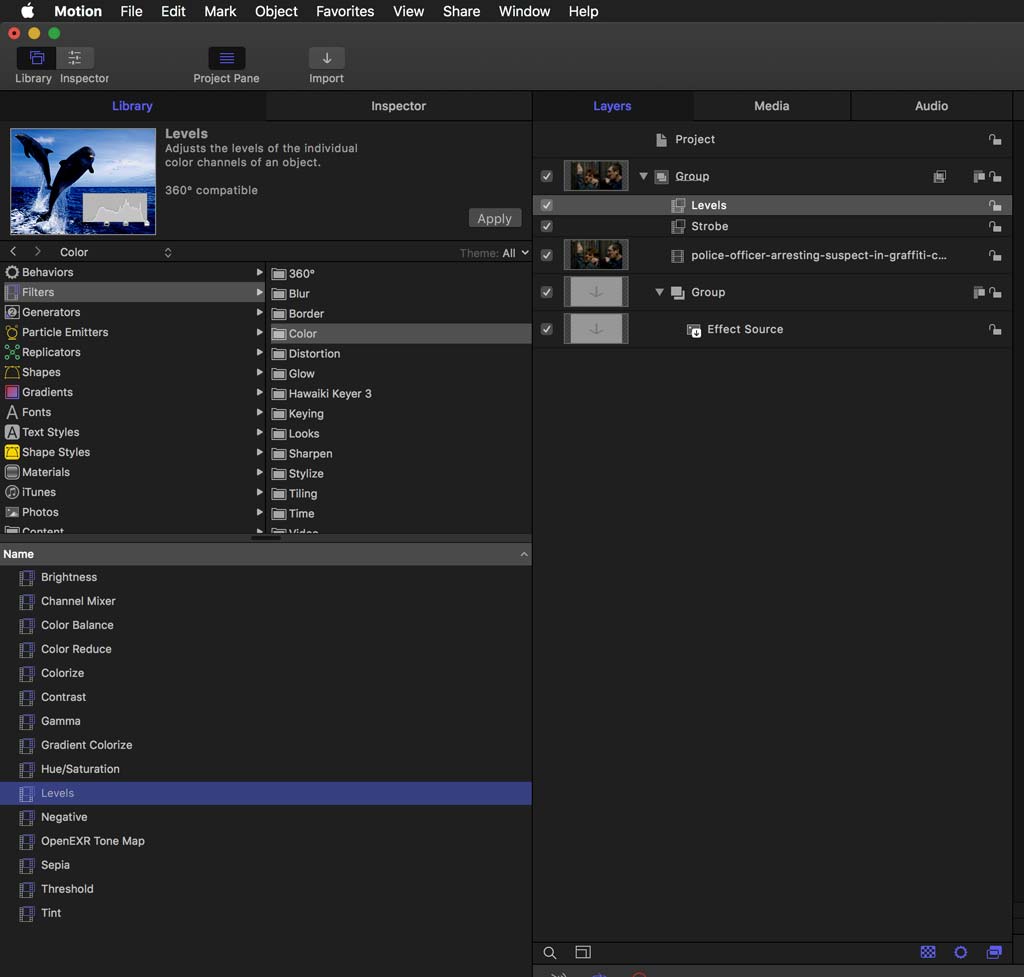
You might have to open up the extended controls by clicking on the triangles.
In the RGB section (Might have to twiddle the triangle to open).
Set:
Black In to 0.05
White In to 0.76
This crushes the blacks and blows out the highlights slightly.
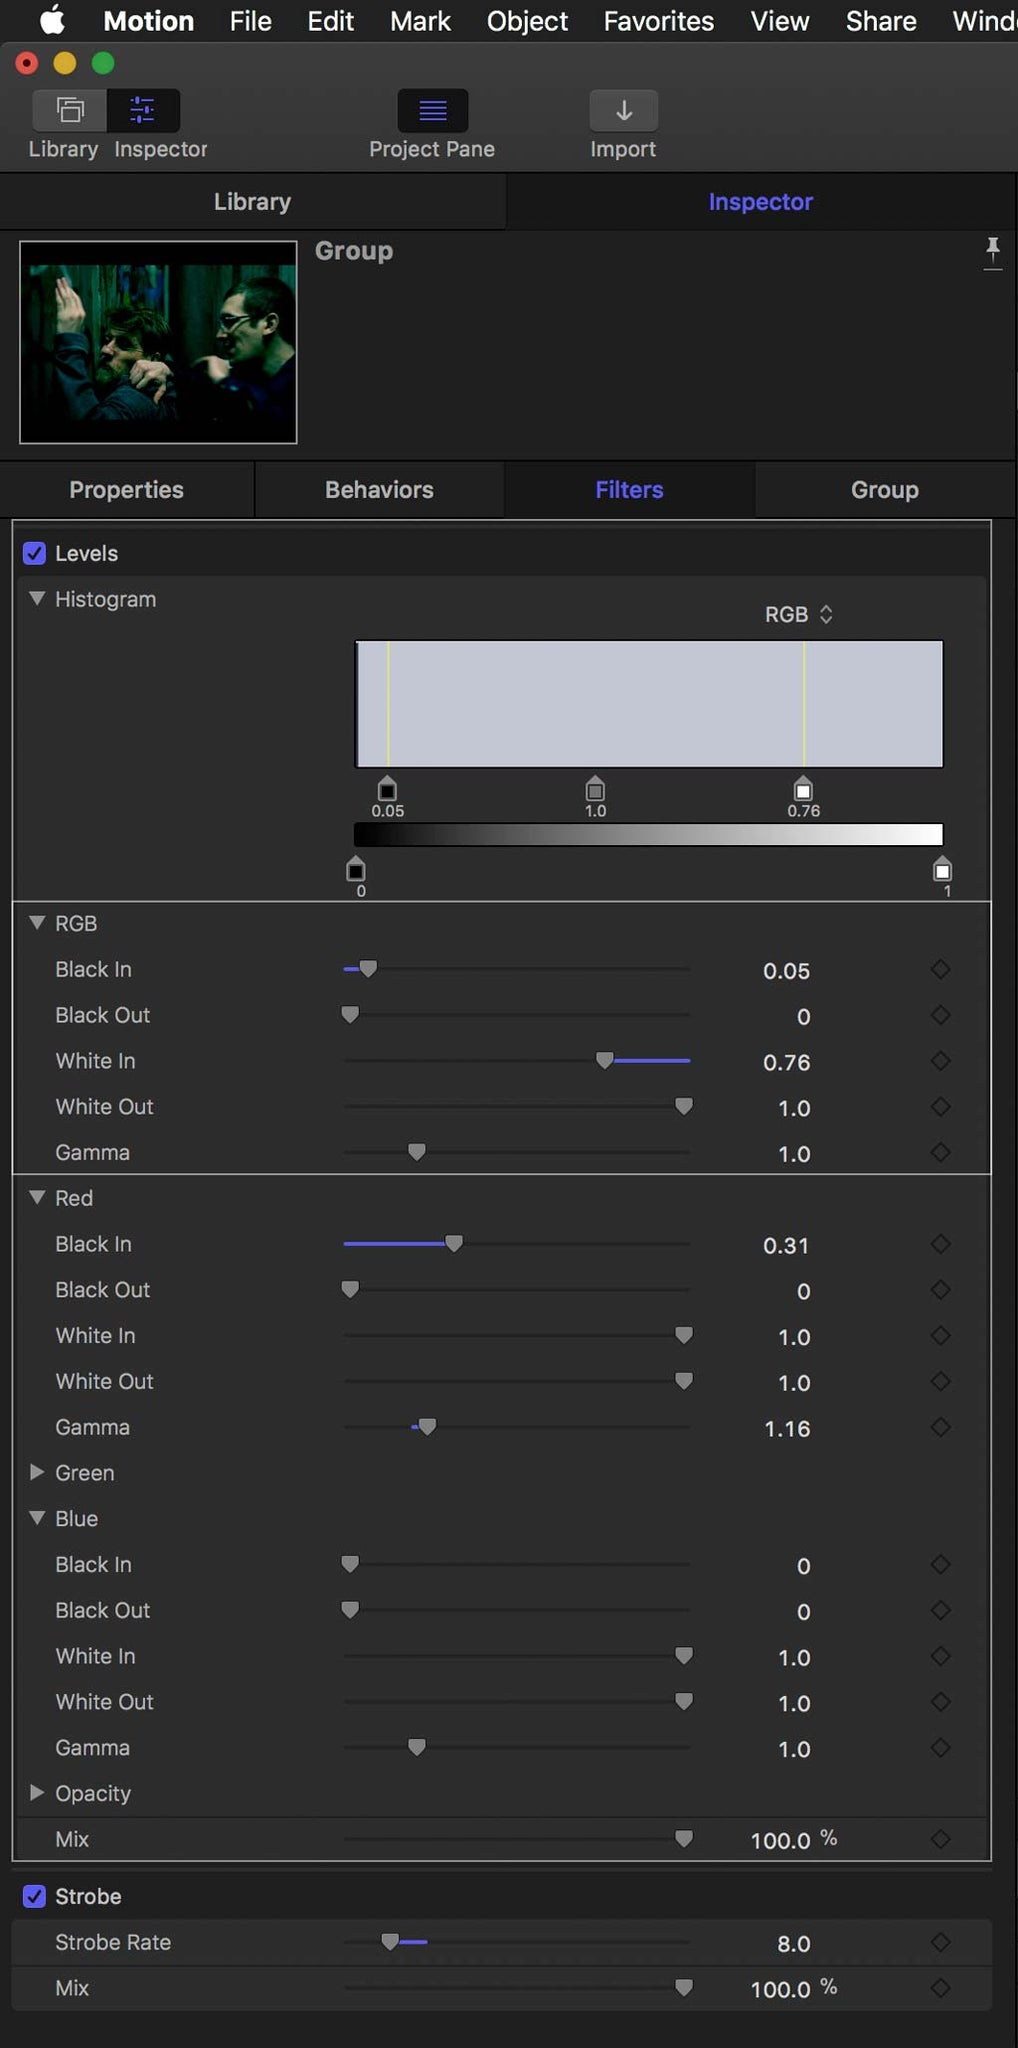
Then in the Red section set
Black In to 0.31and then publish this parameter by right clicking on the right hand side of the parameter as before.

This gives the footage the dark green tint we are after. Remember, the published parameter will allow you to control the amount of tint in FCPX.
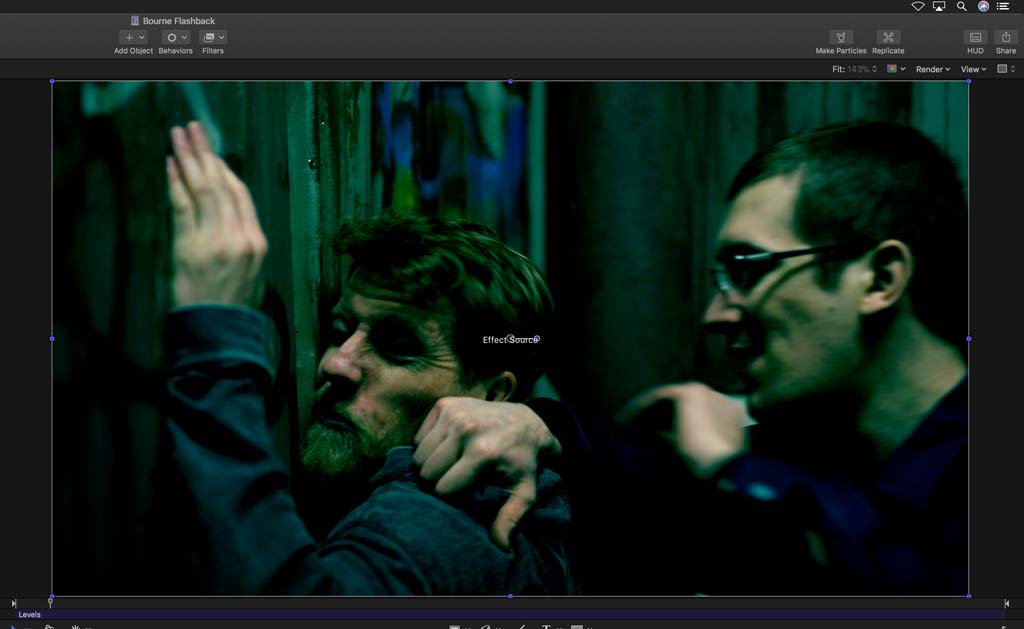
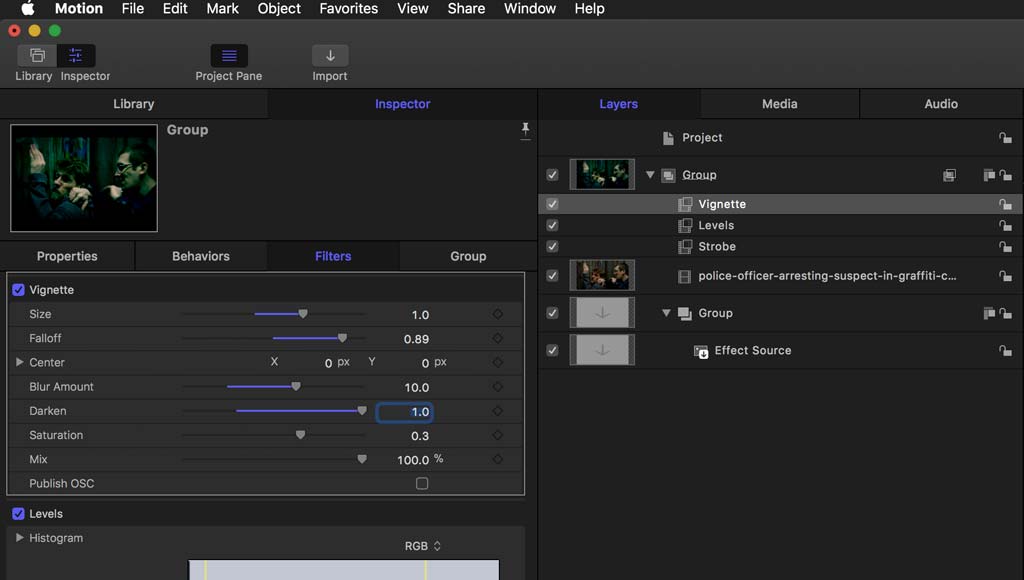
Next add a Vignette. It can be found in the Stylize section in the Filters in the Library.
You can play with the onscreen controls to get the desired effect, or follow our settings.
Size set to 1.0
Falloff set to 0.89
Blur amount set to 10
Darken set to 1
Saturation set to 0.3
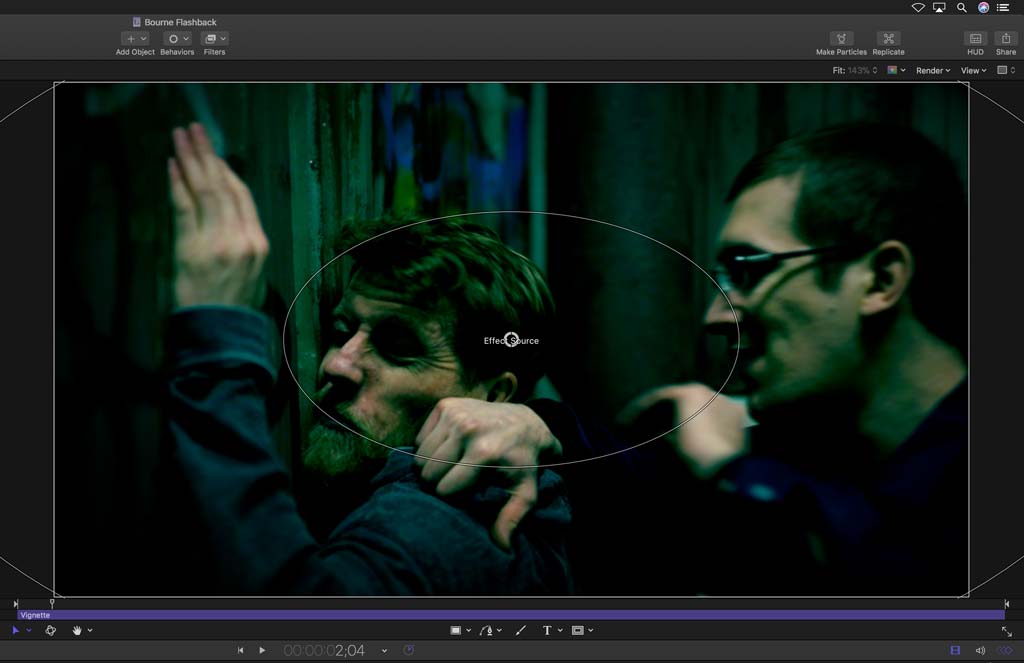
Here you can see the Vignette applied, it darkens and blurs the edges. The thin white ovals are the onscreen controls. Don't worry if it is looking a bit dark, the next stage will fix that.
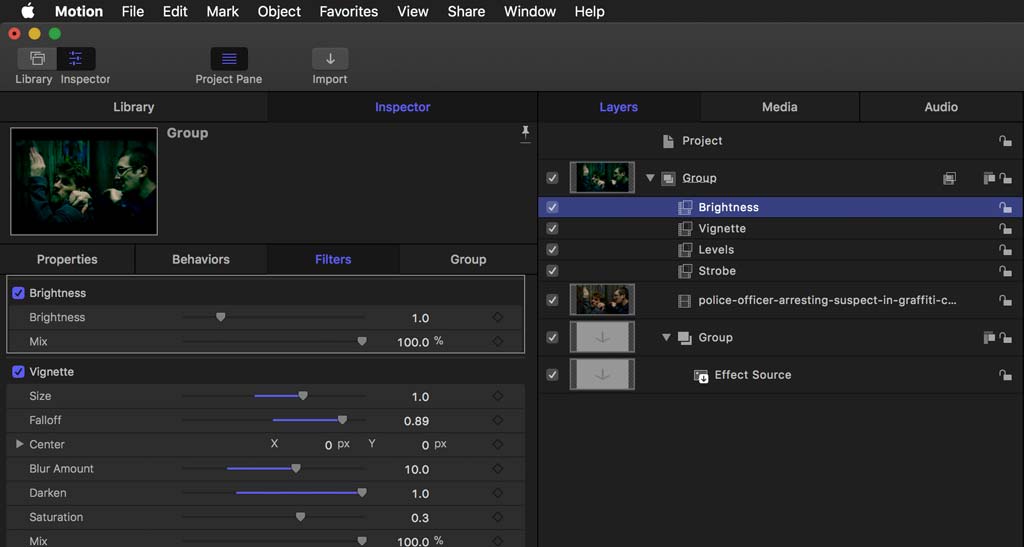
Then apply a Brightness filter - it can be found at the top of the list in the Color selection of the Filters. No need to adjust anything, we are going to let a Randomize behavior do that automatically for us.
Navigate to the Behaviors in the Library. Drag the Randomize Behavior from the Parameter group onto the Group in the Layers that contains the Brightness filter.

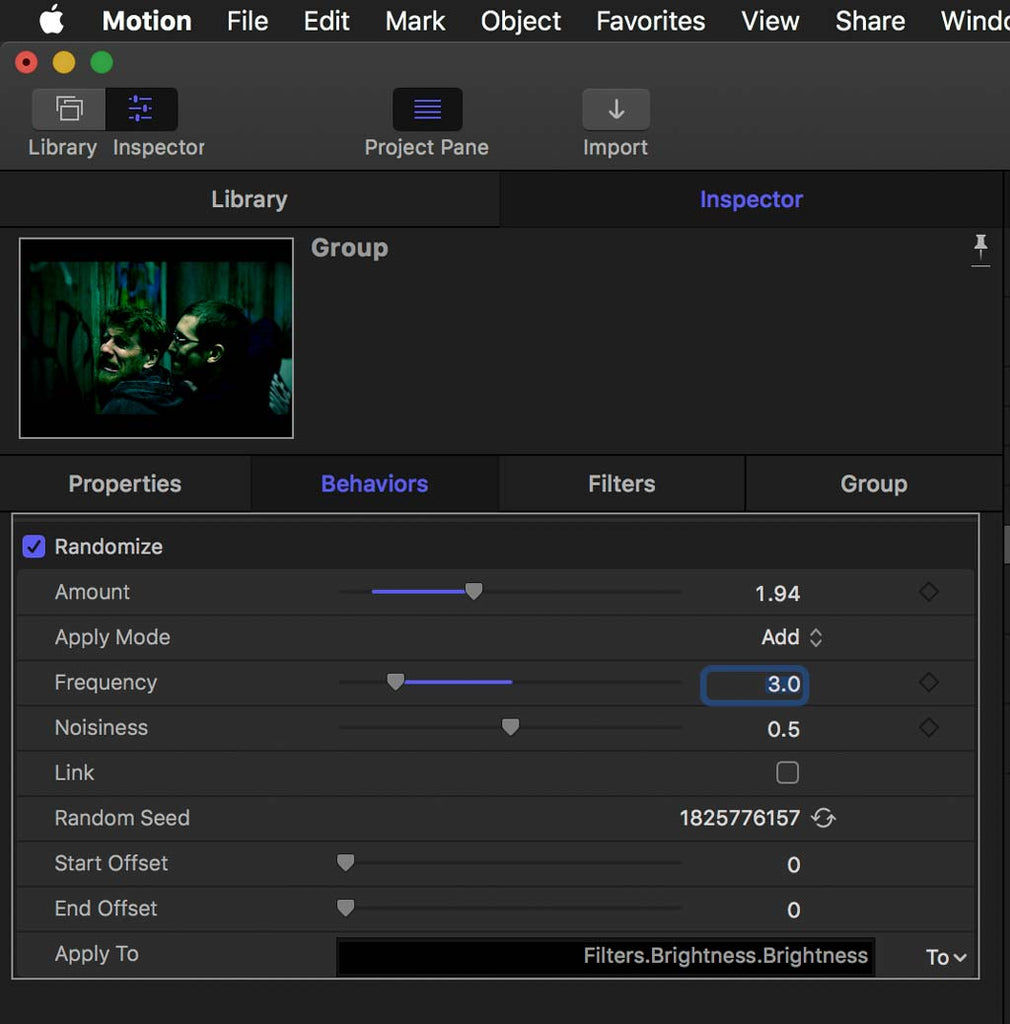
View the parameters for the Randomize behaviour in the Inspector.
At the bottom of the parameters, under Apply To, click the right hand edge and follow the choices:
Apply To / Filters / Brightness /Brightness
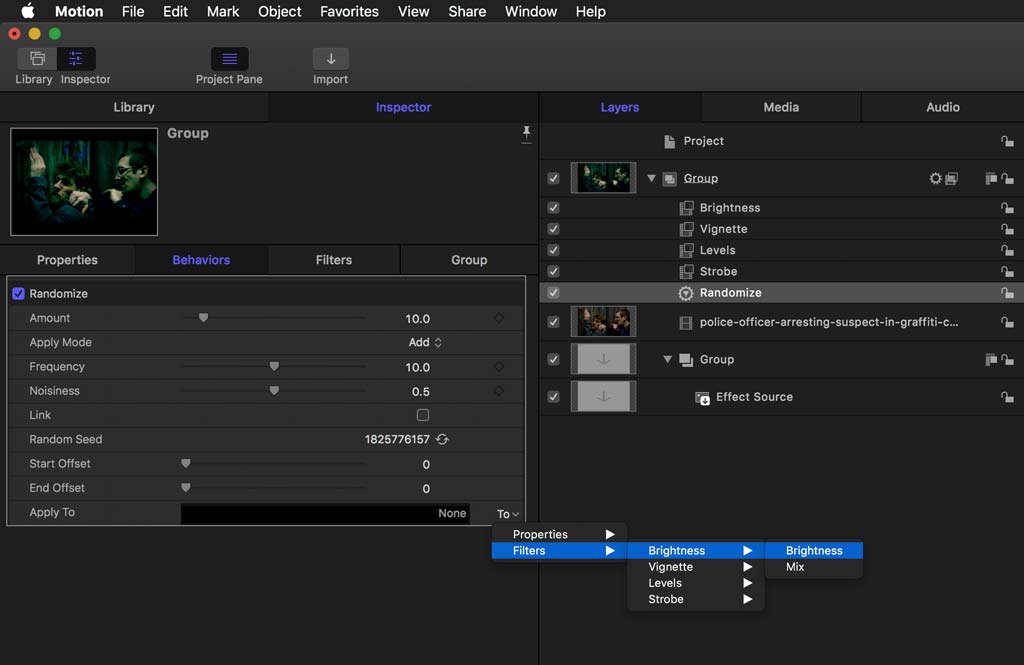
Then set the parameters of the behaviour to:
Amount set to 1.94
Frequency set to 3.0
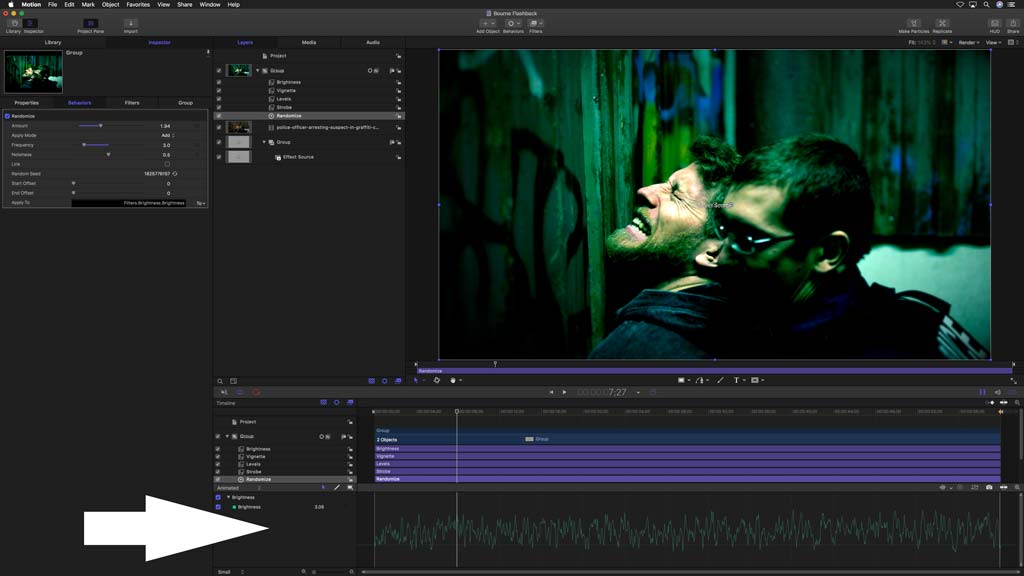
If you toggle on the keyframe view in the timeline, you will be able to see the randomized brightness level. Don't worry if you haven't added any footage and you are seeing a grey flickering arrow on a white background, it will still work the same.
That's the colour correction done, now we need to add the streaks. After another save of course!
The streaks need to be added to another layer as we need to operate the highlights in the footage so that they can be blurred.
Right Click on the top Group in the Layers list and select Make Clone Layer or use the shortcut K.
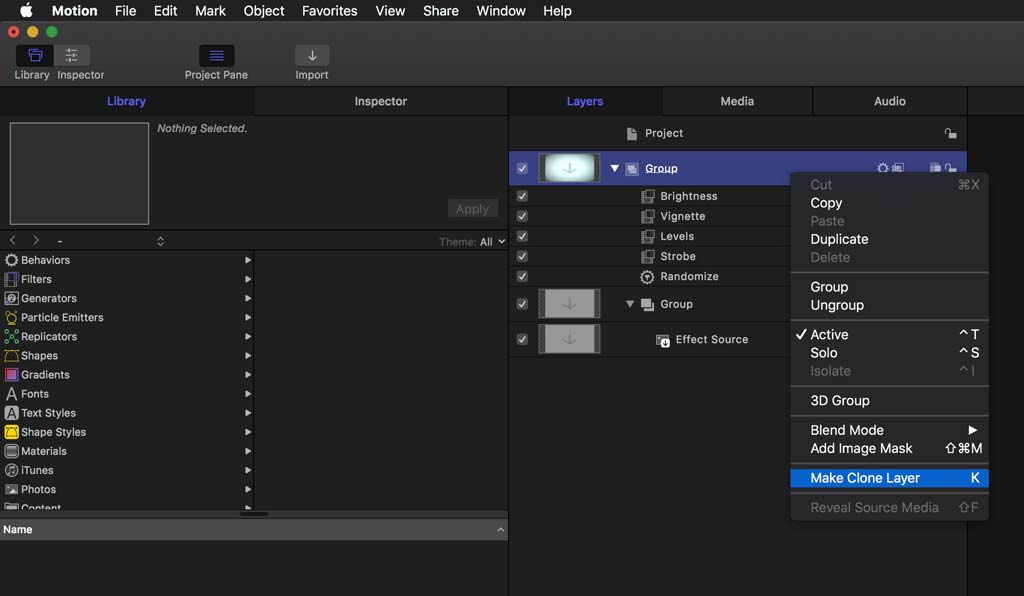
You should end up with a new group with the cloned Group inside of that. Here it has been renamed Streaks to make life a little easier. Cloning the Group means that the streaks will have the Stobe filter applied and will oscillate along with the Brightness Randomization. The streaks will also follow the strobe rate if changed in FCPX.
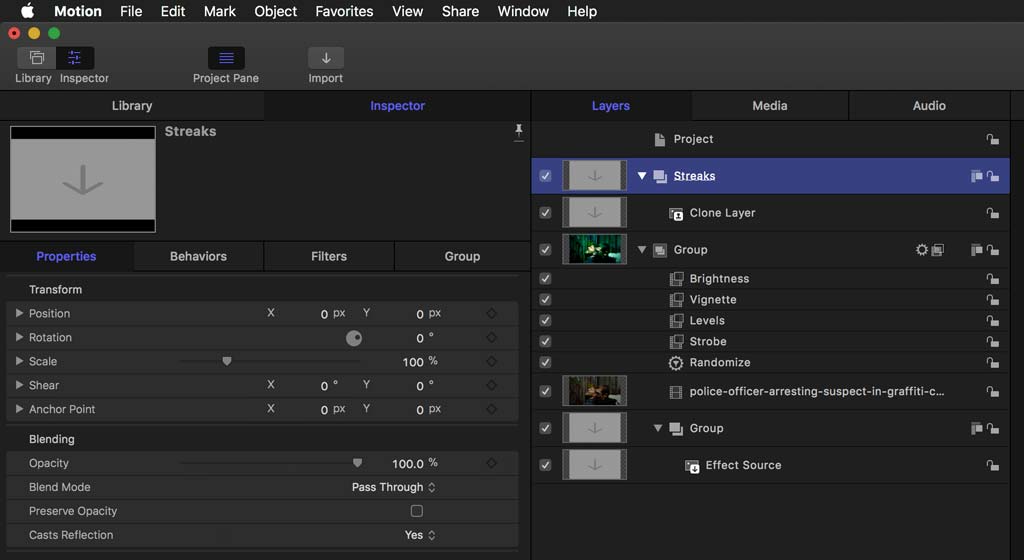
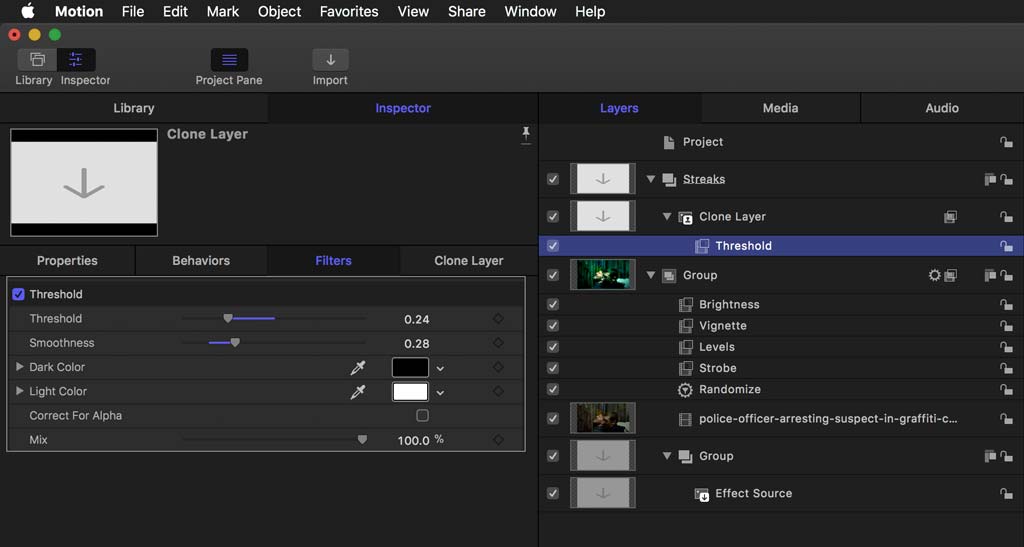
Then add a Threshold filter to the Clone Layer from the Color section of the Filters in the Library. This makes an image made up of only black and 100% white depending on the settings.
Threshold set to 0.24
Smoothness set to 0.28
Then as before, publish these two parameters so they appear in the Project panel and thus will become controls in the FCPX plugin.
One more effect to apply, the blur.
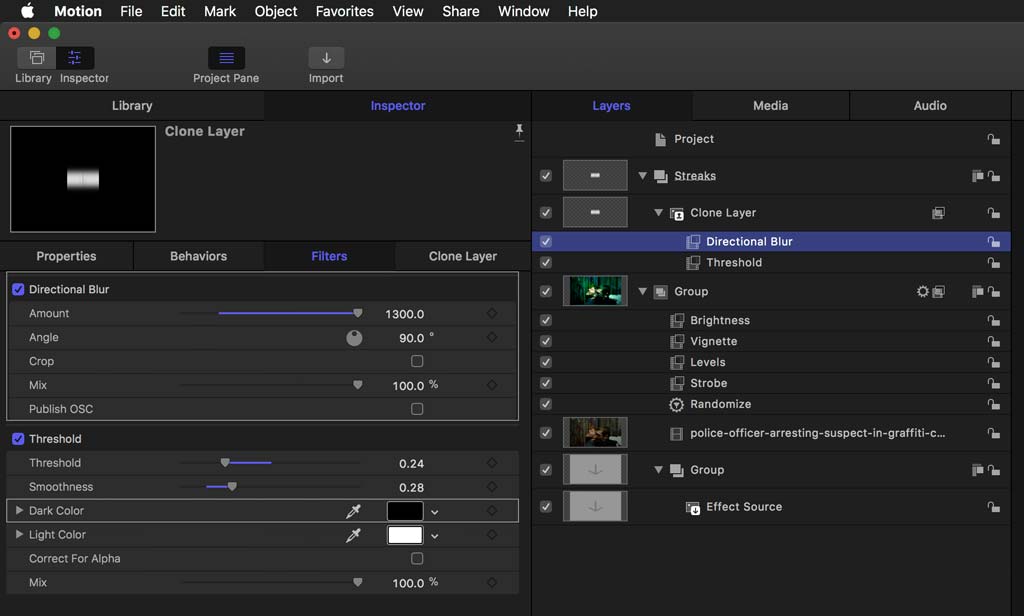
Select Directional Blur from the Blur selection in the Filters within the Library.
Apply the blur to the Clone Layer and then change the parameters.
Amount set to 1300 (yes that's a lot of blur!)
Angle set to 90 degrees
Three things left to do:
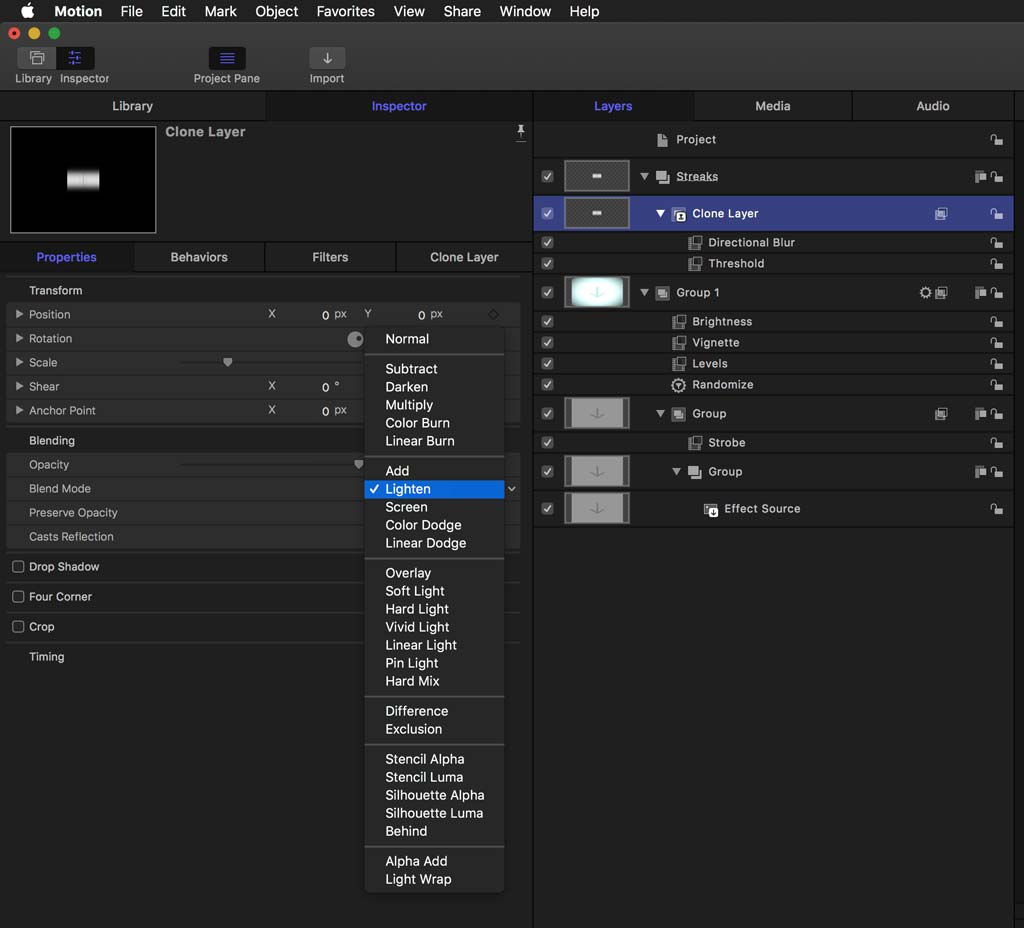
Change the Clone Layer's Blend Mode to Lighten in the Inspector.
Then delete any media you might have inserted into the layer list to make color correction easier. It is easier to follow along when you have media in the Project.
The hit Save (CMD S)
Congratulations, you have just built the Bourne Flashback effect for Final Cut pro X!
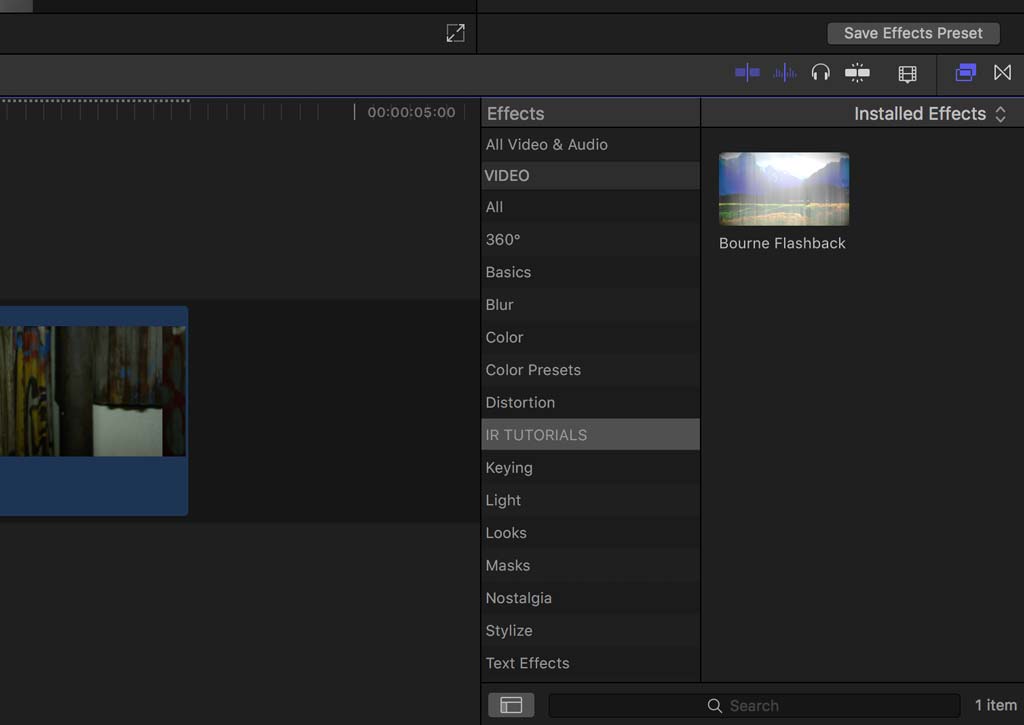
It might not look much in Motion, but when you find the effect in Final Cut Pro (Effects Browser shortcut CMD 5) and apply it to a clip, you will see all your hard work.
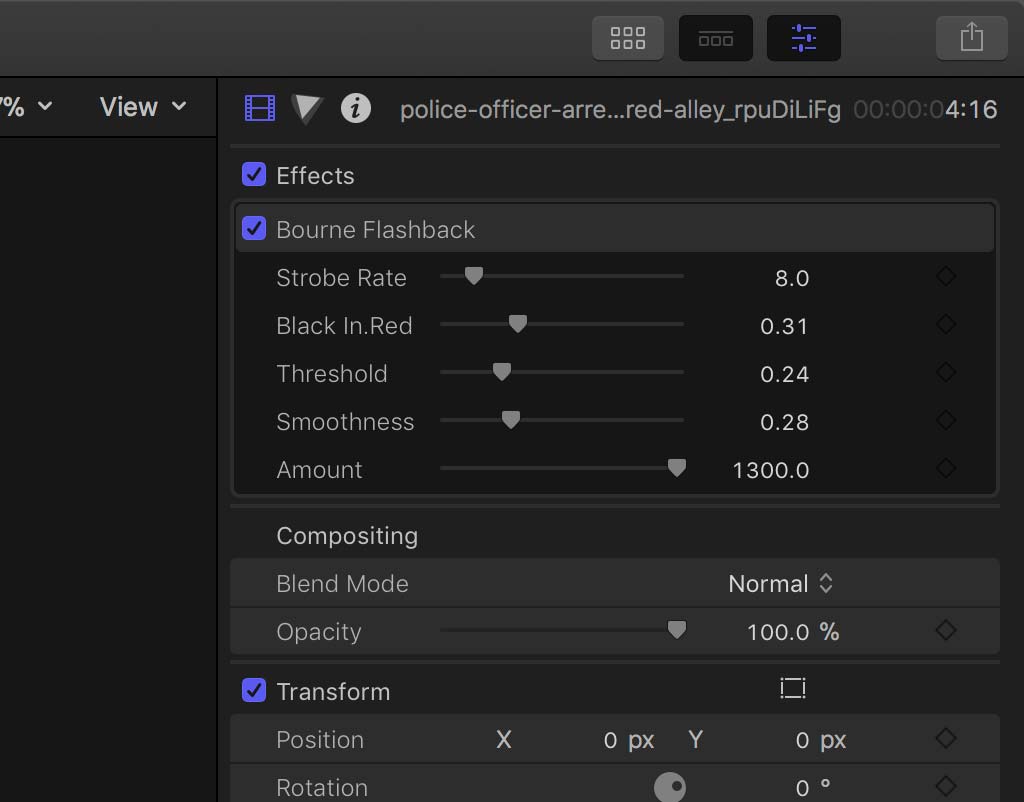
Don't forget the adjustments in the Inspector that have been published, especially good for reducing the streaks in lighter shots.
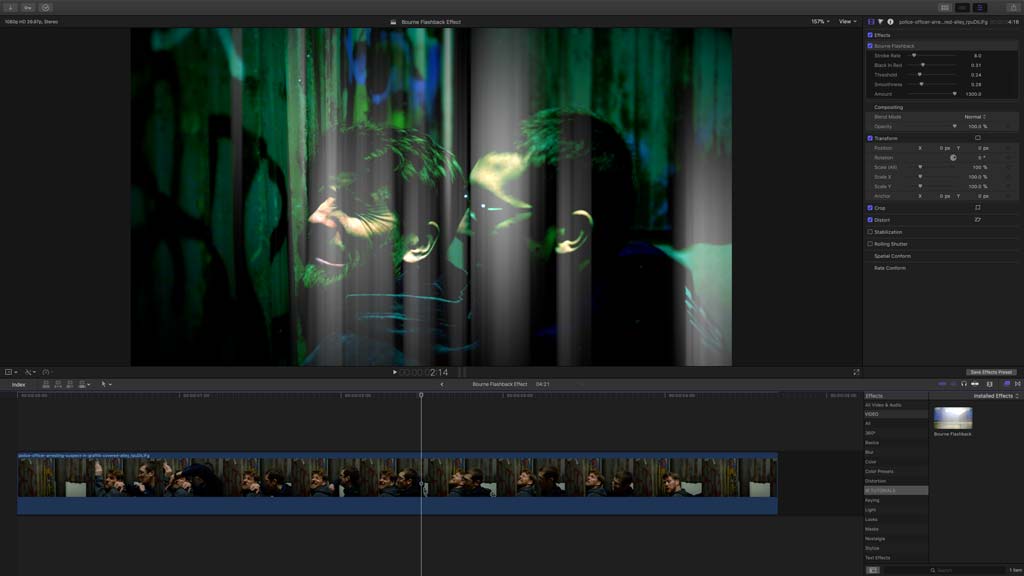
You can always customise the effect by saving as a copy in Motion. You might want to add some colour to the streaks, blow out the whites more or maybe have horizontal streaks instead.
All is possible using Motion to build the effect for you!
Leave a comment
Comments will be approved before showing up.
Also in Tutorials

Rough Graphic to Finished Final Cut Pro Template in Under 5 Minutes Using AI!
Take a simple network diagram example and transform it into a professional Final Cut Pro template. We'll follow a straightforward workflow that anyone can replicate.

AI Just Unlocked a NEW WAY to Colour Grade (Mind Blown!)
We explore how AI can automatically create custom LUTs (.cube files) for professional-grade color grading.

Get Final Cut Pro Sequence Data Into Google Sheets Using AI
How to extract all your Final Cut Pro project data into a spreadsheet. This is incredibly useful for project management, creating edit decision lists, or just keeping track of your media.

